Workflow: MS Word to TEI

For the past couple of years I’ve been refining a workflow to convert MS Word files into publishable TEI. By “publishable” I mean TEI that can be loaded into some existing publication system (something like TEI Publisher, Edition Visualization Technology (EVT), or TEI Boilerplate), or that you could process yourself in some other way.

Why might you want to use such a workflow? In my experience, it’s useful when you have a person or people who are designated as transcribers, but who aren’t comfortable or interested in encoding in XML. Microsoft Word is ubiquitous, so pretty much everyone in academia uses it and has access to it. For people who don’t want to work with pointy brackets but still want to collaborate on a digital editing project, a workflow that converts Microsoft Word to TEI can be very useful. (I have also used this workflow myself, even though I’m capable of hand-encoding XML, just because there are times when I’d rather just to it in Word. YMMV!)

I think the workflow works best when there is one person designated to do all the conversion at the end (steps 4 and 5) and any number of people involved in the first three steps. The workflow could be used in the classroom as a group project (where the students model the TEI, plan the pseudocodes, and do the encoding, and one student or the instructor does the conversion work at the end) although I’ve only used it for non-classroom editing projects.

There are a few things you need in order to be successful with this workflow:

  1. You need a team that knows TEI. This doesn’t mean they need to know XML! (Although yes, you will need someone on your team who knows XML, but that’s not related to TEI) You need to know TEI basics –  what tags and attributes are, how modules and classes work – and you need these because you need to know what TEI tags you want in your final document before you start transcribing.
  2. Microsoft Word (obviously)
  3. OxGarage conversion tools. OxGarage is a service of the Text Encoding Initiative, which provides scripts for converting between a variety of text formats, including MS Word to TEI.
  4. OxygenXML Editor (or an XML editor of your choice). OxygenXML is popular with the TEI community, and it has the find & replace functionality that is required by this workflow. BBEdit is another XML/text editor that I use a lot, and it has a great find & replace functionality, but it doesn’t work as well for this workflow for reasons I’ll describe later in this post.

The steps of the workflow are (briefly):

  1. Model your TEI.
  2. Create pseudocodes to “tag” in MS Word.
  3. Transcribe in MS Word, using the pseudocode “tags” to indicate those things that will eventually be converted into TEI.
  4. Convert the finished MS Word document into TEI using OxGarage.
  5. Use find & replace in OxygenXML to convert the pseudocode tags into TEI tags, resulting in well-formed and complete TEI.

In more detail:

Model your TEI

The very first thing you need to do is to decide what you need your finished TEI to be able to do. If you’re working with an existing system (e.g., if you know you’ll be publishing in EVT at the end) some of your decisions will be made for you, because you will need to have TEI code that the system can use.[1] Are you encoding abbreviations, and if so are you going to tag the entire word or just the abbreviation and expansion? Are you going to normalize spelling, and if so are you going to do it silently or tag it? Are there marginalia you want to include in your TEI code? Do you want to include editorial notes?

Make a list of everything you need in your TEI, which TEI tags you plan to use, and how you plan to use them. You’ll need this to do the next step of the workflow, the creation of pseudocodes.

Create pseudocodes and tag them in MS Word

Pseudocodes are what I call non-TEI formatting elements that are used to set text apart, and are later processed into TEI tags. Pseudocodes can be divided into two main types: native MS Word formatting (italics, underlining, superscript, etc.) and punctuation marks.

Native MS Word Formatting

Native formatting in Word

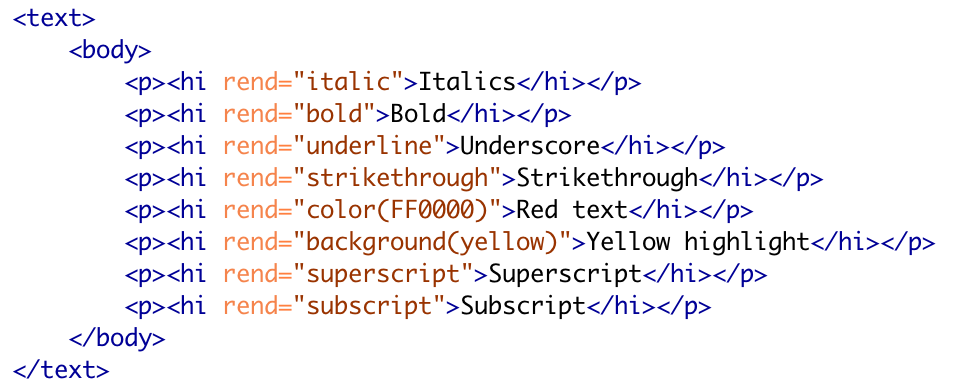
MS Word formatting is converted by OxGarage into TEI <hi> tags with the relevant values for @rend. For example, Italics converts to <hi rend=“italic”>Italics</hi>, Bold converts to <hi rend=”bold”>Bold</hi rend=”bold”>, Underscore converts to <hi rend=“underline”>Underscore</hi>, Strikethrough converts to <hi rend=“strikethrough”>Strikethrough</hi>, Red text converts to <hi rend=“color(FF0000)”>Red text</hi>, Yellow highlight (not an option in WordPress) converts to <hi rend=“background(yellow)”>Yellow highlight</hi>,Superscript converts to <hi rend=“superscript”>Superscript</hi>, and Subscript converts to<hi rend=“subscript”>Subscript</hi>.


This is of course useful if you want these exact tags reflected in your final TEI, but once the TEI comes out of OxGarage, you can use the find and replace function in OxygenXML (or some other text/XML editor) to convert these tags into other tags. More on this below.

Native MS Word formatting works very well and can represent a very large number of TEI tags (using just text color and highlight would give you 75 pseudocodes mapping to 75 TEI tags or tag/abbreviation combinations), but there are definitely cases when you would want to use punctuation marks instead.

Punctuation Marks

You can use punctuation marks to set text apart that might not correspond 1:1 with a TEI tag. These are cases, such as expanded abbreviations or corrected readings, where you need tags nested within tags. Brackets work particularly well for this, especially various combinations of brackets. You do need to be careful about configuring bracket combinations, particularly when you’ll have brackets nested within brackets, and (as will also be mentioned later) the order in which you find & replace brackets later will also be relevant. This isn’t a matter to be taken lightly. You should test your pseudocodes and find & replace expressions on a section of text before encoding a full text.

Here is an example using the first line of Genesis 3, from University of Pennsylvania MS. Codex 236, fol. 31r

Genesis 3:1, UPenn Ms. Codex 236, fol. 31r


The text in this line reads:

sed et serpens erat callidior cūctis aīantib t̄

This includes a number of abbreviations that we could expand silently, or we could encode them in TEI in a few different ways. (For more information see the TEI Guidelines 11.3.1.2, “Abbreviations and Expansion”) Options include:

Noting that a word contains an abbreviation, without expanding it. In this example we put <abbr> tags around the complete word, and <am> tags around the abbreviated letter:

sed et serpens erat callidior <abbr>c<am>ū</am>ctis</abbr> <abbr>a<am>ī</am>anti<am>b</am></abbr> <abbr><am></am></abbr>

In word, you might choose pseudocodes using nested brackets. In this case, [[]] will be converted later into <abbr></abbr>, and [] (nested within [[]]) will be converted to <am></am>:

sed et serpens erat callidior [[c[ū]ctis]] [[a[ī]antib]] [[[t̄]…]]

Alternatively, you might choose to encode both abbreviation and expansion, and enable the system to choose between them. In this example we add <expan> and <ex> tags to the mix alongside <abbr> and <am>, and then include <choice> to make it clear that the abbreviations and expansions come in pairs.:

sed et serpens erat callidior

<choice>

<abbr>c<am>ū</am>ctis</abbr>

<expan>c<ex>un</ex>ctis</expan>

</choice>

<choice>

<abbr>a<am>ī</am>anti<am>b</am></abbr>

<expan>a<ex>nim</ex>antib</expan>

</choice>

<choice>

<abbr><am></am></abbr>

<expan><ex>ter</ex></expan>

</choice>

As above, you can come up with combinations of marks that you can use to indicate the encoding. In this case <abbr> and <am> are encoded as above, || will later be converted to <choice>, {{}} will be converted later into <expan></expan>, and {} (nested within {{}}) will be converted to <ex></ex>:

sed et serpens erat callidior |[[c[ū]ctis]]{{c{un}ctis}}| |[[a[ī]anti[b]]]{{a{nim}anti{bus}}}| |[[[t̄]]]{{{ter}…}}|

I like to group brackets of the same type together (as here, where square brackets are used for abbreviations, curly brackets for expansions, and pipes for choice) but you can also combine them in various ways for more options. For example, here are the bracketing options for a project I’m currently working on:

In all cases you need to be very careful that the punctuation marks you use don’t appear in your text, or only use them in combinations that don’t appear in your text, or else you will accidentally create TEI tags where you don’t want them.

Convert Word to TEI in OxGarage

Once you’ve transcribed and entered pseudocodes in MS Word, it’s time to convert your Word file into TEI. You can do this using OxGarage, a conversion service provided by the TEI. OxGarage has an online interface where you can convert one document at a time, described here, but you can also download the XSLTS from GitHub and run bulk conversion processes (converting multiple files at one time).

The online OxGarage interface is at http://www.tei-c.org/oxgarage/. You need to indicate that you are converting Documents, then select your options from (Microsoft Word doc or docx) and to (TEI P5), then load in your Word document and click “Convert”. Here is my input file (so you can download it and try this yourself), and a screenshot: 
OxGarage will generate a TEI file with a template header (including information gleaned from the Word document) and the textual content of the Word doc converted into very basic TEI (file here; you’ll need to change the file extension to .xml):

You can see here how the Word comment is converted into a <note> nested in <hi>, with a <date> included. I also included some red text (to indicate the tyronian et symbol) which has converted as expected. The punctuation mark pseudocodes are unchanged.

Replace Pseudocodes with TEI Tags

This is where we replace those pseudocodes – the <hi> color tags and the combinations of punctuation marks – into TEI. I like to do this in OxygenXML, because that software has advanced and advanced find & replace that enables you to search using regular expressions, including the ability to save pieces of what is being searched and reusing that in the replace (a bit like setting a variable in the search).[2]

As mentioned above the order in which you replace tags matters. You will always want to replace the outermost pseudotags first, then the interior ones, because the find & replace will always match from the first instance of a character in the regular expression to the last instance. This means that if you have […] (for <am>) nested inside [[…]] (for <abbr>) you need to replace the [[…]] before the […] or else you will end up with <am> around the word, and there will be no match when you then search for [[…]].

For example, to find [[…]] and replace it with <abbr>, using Find/Replace with the “Regular Expression” and “Dot matches all” boxes checked, you would search for:

\[\[([^\s]*)\]\] (this is a regular expression that will find every instance where a string of any character except spaces (\s), enclosed by [[ and ]] . The central part of the expression is enclosed with parentheses because we’re going to reuse that in the replace. The square brackets are preceded by \ to ensure they are considered as characters and not as part of a regular expression)

And replace that with

<abbr>$1</abbr> (This will replace the [[ and ]] with the closing and ending tags, and copy everything else in the middle – $1 refers to the piece of the search that was enclosed in parentheses)

Unfortunately, if you have an abbreviated word that starts on one line and ends on the following line (as we do here – the last word on this line is terre, but the re are on the next line) this regular expression won’t catch it because it ignores all spaces. So I do two sets of finds for each set of pseudocodes: one using the expression above, which ignores spaces, and a second one which includes spaces.

\[\[(.*)\]\] (replace with <abbr>$1</abbr>) as above

You don’t want to include spaces in your first search because if you have multiple sets of the same pseudocode in your document (which you probably do), the regular expression will include all the spaces so will only find the very first and the very last instance of the double brackets and you’ll end up with this:

The regular expression has matched the first [[ (on line 43) and the last]] (on line 46), but there are many in between that are missed because spaces are included.

Starting with the first search followed immediately with the second gives you:

Similarly, tag abbreviations by replacing |…| with <choice></choice> and {{..}} with <expan></expan>  – all the outer nesting has been replaced with TEI tags:

When you have multiple codes that may be nested in a single tag (as the multiple [] and {} now within <abbr> and <expan>) you need to modify the regular expression again, so it catches every matching pair of brackets.

\{([^\s\}]*)\} (Note the \} now within the square brackets. This will keep the expression from moving past the first closing bracket)

The result is a complete set of TEI tags encoding abbreviations and expansions (result file here, change the file extension to .txt).


You can also use OxygenXML’s find & replace function to replace the pseudocode TEI tags, or you can be fancy and write an XSLT to do that work. In this example, I want to replace the <hi rend=”color(FF0000)”> with <g ref=”#t_et”> (I’ll add a corresponding <glyph> tag to the <charDecl> section of the header as described in 5.5.2 of the TEI Guidelines). This is fairly straightforward, since I know the content of the tag will always be “et” I can do a find & replace for the whole thing. If the content of the tag varies, I can use a regular expression as I did above to copy content from find to replace.

And that’s the workflow. It’s still a lot of work, you need a strong handle on the TEI and you need to plan everything in advance. But if you are working with a large number of people transcribing and advanced TEI training isn’t possible or desirable. 

[1] EVT for example has specific requirements for tags it can process and how those tags need to be formatted, and if your TEI doesn’t meet those requirements it won’t work out of the box – you’ll need to modify the EVT code to suit your TEI.

[2] For more information and tutorials on Regular Expressions, visit https://regexone.com/.

Ceci n’est pas un manuscrit: Summary of Mellon Seminar, February 19th 2018

This post is a summary of a Mellon Seminar I presented at the Price Lab for Digital Humanities at the University of Pennsylvania on February 19th, 2018. I will be presenting an expanded version of this talk at the Rare Book School in Philadelphia, PA, on June 12th, 2018

In my talk for the Mellon Seminar I presented on three of my current projects, talked about what we gain and lose through digitization, and made a valiant attempt to relate my talk to the theme of the seminars for this semester, which is music and sound. (The page for the Mellon Seminars is here, although it only shows upcoming seminars.) I’m not sure how well that went, but I tried!

I started my talk by pointing out that medieval manuscripts are physical objects – sometimes very large objects! They have weight and size and heft, and unlike static objects like sculptures, manuscripts move. They need to move in order for us to read them. But digitized manuscripts – the ones you find for example in Penn in Hand, the page-turning interface for Penn’s digitized manuscript collection – don’t really move. Sure, we have an interface that gives the impression of turning the pages of the book, but those images are flat, static files that are just the latest version in a long history of facsimile copies of manuscripts. A page-turning interface for medieval manuscripts is the equivalent of taking a book, cutting the pages out, and then pasting those pages into a photo album. You can read the pages but you lose the sense of the book as a physical object.

It sounds like I’m complaining, but I’m really not. I like that digital photographs of manuscripts are readily available and relatively standard, but I do think it’s vitally important that people using them are aware of how they’re different from the “real” manuscript. So in my talk I spent some time deconstructing a screenshot from a manuscript in Penn in Hand (see above). It presents itself as a manuscript opening (that is, two facing pages), but it should be immediately apparent that this is a fake. This isn’t the opening in the book, it’s two photos placed side-by-side to give the impression of the opening of the book. There is a dark line down the center of the window which clearly delineates the photo on the left and the one on the right. You can see two gutters – the book only has one, of course, but each photo includes it – and you can also see a bit of the text on the facing page in each photo. From the way the text is angled you can tell that this book was not laid flat when it was photographed – it was held at or near a 90 degree angle (and here’s another lie – the impression that the page-turning interface gives us is that of a book laid flat. Very few manuscripts lay flat. So many lies!).

We can see in the left-hand photo the line of the edge of the glass, to the right of the gutter and just to the left of the black line. In our digitization lab we use a table with a spring-loaded top and a glass plate that lays down on the page to hold it flat. (You can see a two-part demo of the table on Facebook, Part One and Part Two) This means the photographer will always know where to focus the camera (that is, at the level of the glass plate), and as each page of the book is turned the pages are the same distance from the camera (hence the spring under the table top). I think it’s also important to know that when you’re looking at an opening in a digital manuscript, the two photos in that composite view were not taken one after the other; they were possibly taken hours apart. In SCETI, the digitization lab in the Penn Libraries, all the rectos (that is, the front of the page) are taken at one time, and then the versos (the back of the page) are taken, and then the system interleaves them. (For an excellent description of digital photography of books and issues around it please see Dr. Sarah Werner’s Pforzheimer Lecture at the Harry Ransom Center on Early Digital Facsimiles)

I moved from talking about how digital images served through page-turning interfaces provide one kind of mediated (~fake~) view of manuscripts to one of my ongoing projects that provides another kind of mediated (also fake?) view of manuscripts: video. I could talk and write for a long time about manuscript videos, and I am trying to summarize my talk and not present it in full, so I’ll just say that one advantage that videos have over digitized images is that they do give an impression of the “real” manuscript: the size of them, the way they move (Is it stiff? How far can it open? Is the binding loose or tight?), and – relevant to the Seminar theme! – how they sound. I didn’t really think about it when I started making the videos four years ago, but if you listen carefully in any of the videos you can hear the pages (and in some cases the bindings), and if you listen to several of them you can really tell the difference between how different types of parchment and paper sound. Our complete YouTube playlist of video orientations is here, but I’ll embed one of my favorites here. This is LJS 280, a 13th century copy of Decretales Gregorii IX in a 15th century chain binding that makes a lot of noise.

I don’t want to imply that videos are better than digital images – they just tell us something that digital images can’t. And digital images are useful in ways that videos aren’t. For one thing, if you’re watching a video you can see the way the book moves, but I’m the one moving it. It’s still a mediated experience, it’s just mediated in a different way. You can see how it moved at a specific time, in a specific situation, with a specific person. If you want to see folio 45v, you’re out of luck, because I didn’t turn to that page (and even if I had, the video resolution might not be high enough for you to read it; the video isn’t for reading – that’s why we have the digital images).

There’s another problem with videos.

In four years of the video orientation program, we have 74 videos online. We could have more if we made it a higher priority (and arguably we should), but each one takes time: for research, to set up and take down equipment, for the recording (sometimes multiple takes), and then for the processing. The videos are also part of the official record of the manuscript (we load them into the library’s institutional repository and link them to records in the library’s catalog) and doing that means additional work.

At this point I left videos behind and went back to digital images, but a specific project: Bibliotheca Philadelphiensis, which we call BiblioPhilly. BiblioPhilly is a major collaborative project to digitize medieval manuscripts from institutions across Philadelphia, organized by the Philadelphia Area Consortium of Special Collections Libraries (PACSCL) and funded by the Council on Library and Information Resources (CLIR). We’re just entering year three of a three-year grant, and when we’re done we’ll have 476 manuscripts online (we have around 130 online now). If you’re interested in checking out the manuscripts that are online, and to see what’s coming, you can visit our search and browse site here.

The relevance of BiblioPhilly in my talk is that we’re being experimental with the kind of data we’re creating in the cataloging work, and with how we use that data to provide new and different manuscript views.

Manuscript catalogers traditionally examine and describe the physical structure of the codex. Codex manuscripts start as sheets of parchment or paper, which are stacked and folded to create booklets called quires. Quires are then gathered together and sewn together to make a text block, then that is bound to make the codex. So describing the physical structure means answering a few questions: How many quires? How many leaves in each quire? Are there leaves that are missing? Are there leaves that are singletons (i.e., were never part of a sheet)? When a cataloger has answered these questions they traditionally describe the structure using a collation formula. The formula will list the quires, number of leaves in a quire, and any variations. For example, a manuscript with 10 quires, all of which have eight leaves except for quire six which has four, and there are some missing leaves, might have a formula like this:

1-4(8), 5(8, -4,5), 6(4), 7-10(8)

(Quires 1 through 4 have eight leaves, quire 5 had eight leaves but four and five are now missing, quire 6 has four leaves, and quires 7-10 have eight leaves)

The formula is standardized for printed books, but not for manuscripts.

Using tools developed through the research project VisColl, which is designing a data model and system for describing and visualizing the physical construction of manuscripts, we’re building models for the manuscripts as part of the BiblioPhilly cataloging process, and then using those models to generate the formulas that go into our records. This itself is good, but once we have models we can use them to visualize the manuscripts in other ways too. So if you go to the BiblioPhilly search and browse site and peek into the records, you’ll find that some of them include links to a “Collation View”

Following that link will take you to a page where you can see diagrams showing each quire, and image files organized to show how the leaves are physically connected through the quire (that is, the sheets that were originally bound together to form the quire).

Like the page-turning interface, this is giving us a false impression of what it would be like to deconstruct the manuscript and view it in a different way, but like the video is it also giving us a view of the manuscript that is based in some way on its physicality.

And this is where my talk ended. We had a really excellent question and answer session, which included a question about why I don’t wear gloves in the videos (my favorite question, which I answer here with a link to this blog post at the British Library) but also a lot of great discussion about why we digitize, and how, and why it matters, and how we can do it best.

Thanks so much to Glenda Goodman and Stewart Varner for inviting me, and to everyone who showed up.